

Set page margins to match your document
Use Page setup to adjust page margins. Check sections, units, indents and headers, then review the file you will print or share.
Key Takeaways
- On a computer, open File, then Page setup. Choose Pages and enter the margins you need.
- Match the change to the whole file or the right section. Check the scope before you apply it.
- Page margins, paragraph indents and header spacing control different parts of a document.
- Review the paper size and final print preview. A neat editing view is only part of the job.
To change margins in Google Docs on a computer, open File, then Page setup. Choose Pages. Enter the margin sizes you need and click OK. These steps follow Google’s page-settings help. Check the units. Confirm which part of the file will change.
A margin sets the space between a page edge and the main content area. That space gives your text a clear boundary. A change can also affect where words wrap and where later content falls. So it helps to know your goal before you move anything.
Your class may ask for a set amount of space. A report may need room for binding. Or one paragraph may sit farther inward than the rest. Those jobs call for different controls. This guide shows how to choose the right one, apply a precise change and review the result.
Choose the spacing control that fits the problem
Start by looking at the pattern. Is the main text too close to every page edge? Does one paragraph start too far inward? Is the problem only above a running header? The pattern helps you find the setting that owns the space.
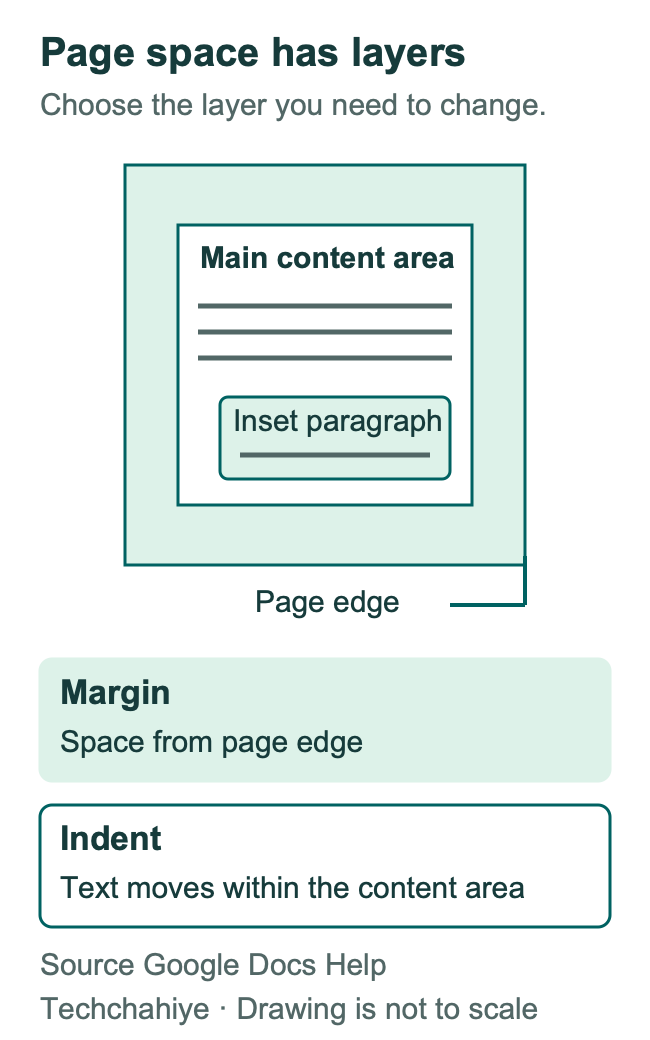
A page margin sets an outer boundary for the main content. A paragraph indent moves selected text inward from that boundary. A header has its own area and spacing controls. These settings can work together, so changing one may leave another source of space in place.
| What you want to change | Start with | Check afterward |
|---|---|---|
| Space around the main content | Page setup margins | All affected page edges |
| Where a paragraph starts or ends | Paragraph indents | First and wrapped lines |
| Space around running header text | Header settings | Header and body position |
| Width while reading a Pageless file | Pageless text width | Your own viewing width |
| A wide chart on one part of a report | Section layout and paper orientation | The pages before and after it |
For example, a reference list may have first lines at one edge and later lines farther inward. That is a hanging indent. Moving the whole page margin would also move nearby content that may already be correct. Keep that layout task in the paragraph settings.
Write the goal in plain words. “Give the whole report equal side margins” points to a page setting. “Move this quotation inward” points to a smaller selection. A clear goal keeps a small repair from turning into a full layout rewrite.
How to change margins in Google Docs on a computer
Use Page setup when you need a measured page margin. It gives you a place to enter a value, which is easier to check than a visual guess. The same route applies to a Google Doc opened on a computer, including a Windows PC, Mac or Chromebook.
- Open the document in Google Docs.
- Open the File menu and choose Page setup.
- Select Pages at the top of the dialog.
- Find the margin fields and read the units shown.
- Enter the required top, bottom, left and right values.
- Check any scope choice in the dialog, then click OK.
Read each field label as you enter it. A larger left margin and a larger top margin solve different needs. If the brief calls for equal margins, check all four values. One field left from an old template can leave the page uneven.
After applying the change, inspect the start of the document and a later page. Check where the text begins and ends. Then look at any table, image or long heading close to an edge. Those items may reveal an awkward fit sooner than a short paragraph does.
For a shared report, tell the other editor the values you used and the scope. “Side margins set to the requested size for the main report” is easy to review. It also gives them enough detail to spot a change that reached the appendix by mistake.
Check Pages and Pageless before you change the layout
Google Docs offers Pages and Pageless formats. Google’s page-format help describes Pages. It supports margin size and paper orientation. Pageless creates a continuous document that adjusts to the screen. Choose the format that matches the result your reader needs.
A paper, form or PDF with a fixed layout usually needs page boundaries. In that case, open File, then Page setup, and select Pages. Review the file after switching. A long file can need a fresh layout check once you can see how its content falls on pages.
For an online working document, you may simply want a wider reading area. Google documents View, then Text Width for Pageless files. The choices are narrow, medium and wide. This is a view preference. Google says your choice does not change how other people see the document.
That distinction matters in a shared file. Your Pageless view can be wider or narrower. A colleague can still see a different width. If everyone must review the same fixed page edges, agree on a page layout and inspect the shared output.
Google also says some page features are unavailable in Pageless format. Headers and footers that were already present can be hidden there and reappear in Pages. Keep that in mind when a file seems to have lost a page feature after a format switch.
Apply the change to the right part of a long document
A report can contain several sections with different needs. The main text may use one layout while an appendix holds wide charts. Google’s break-and-margin help says Page setup can target the sections you choose. Check that scope when a change affects only part of the file.
Before making a local change, find where the intended section begins and ends. Google documents View, then Show section breaks to reveal these boundaries. A page break and a section boundary serve different roles. A new page alone does not describe the full layout scope.
Place your cursor in the part you mean to change, then open Page setup. Read the available scope choice and select the intended section or sections. Set the margins and apply the change. Check the first and last page in that area, plus a page on each side.
For a hypothetical report, suppose only the appendix needs extra room at the left edge. The goal is a local change. After applying it, look back at the final page of the main report. If that page has moved too, inspect the scope before making more edits.
Add section breaks only where the layout needs them. Use a separate section when the content needs its own page layout. Give each boundary a clear purpose. The next editor should know why it is there.
Read the units and work out the usable space
A precise value only helps when you use the right units. Read what the dialog shows. Check that the brief and the field use the same units. Convert the value first if they differ. Avoid typing a familiar number without checking its meaning.
The basic width calculation is simple. Start with the paper width. Subtract the left margin and the right margin. The result is the width left between those page margins. A paragraph indent can then make a particular paragraph narrower within that area.
Here is a hypothetical layout using inches. These are example inputs, not a rule for your document or a report of a software test.
| Example page width | Left margin | Right margin | Width between side margins |
|---|---|---|---|
| 8.5 inches | 1 inch | 1 inch | 6.5 inches |
| 8.5 inches | 1.5 inches | 1 inch | 6 inches |
| 8.5 inches | 0.75 inch | 0.75 inch | 7 inches |
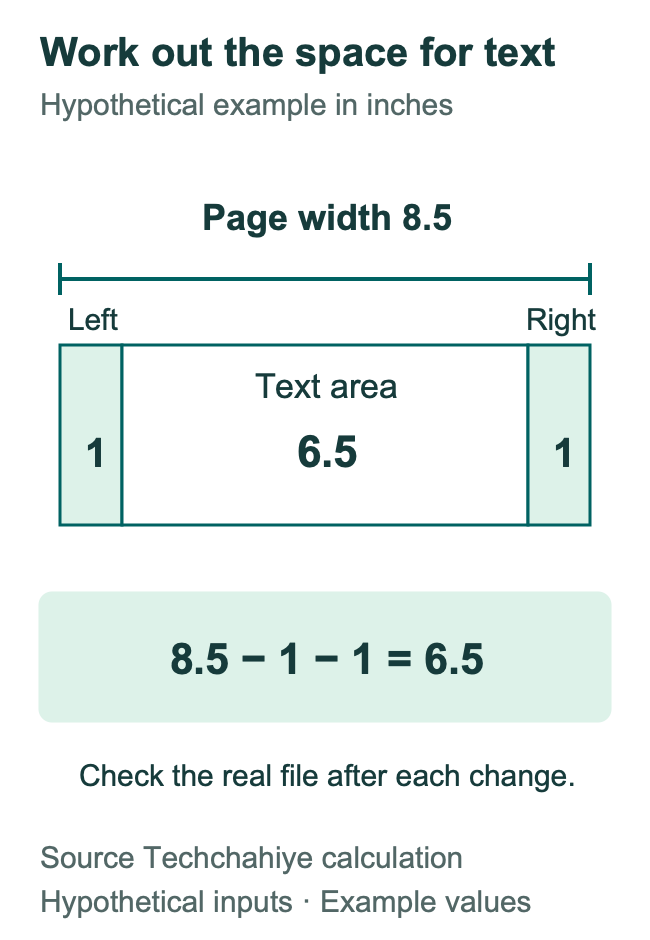
The first row uses 8.5 minus 1 minus 1. The second gives the left side another half inch, so the remaining width falls by half an inch. The third uses smaller side margins, which leaves a wider area for the content.
This arithmetic helps explain the tradeoff. It does not predict an exact line count or page count. Font size, word length, paragraph spacing and objects also shape the page. Use the calculation to understand the space, then review the actual document.
Keep paragraph indents and ruler changes under control
A paragraph can appear to have a large margin even when the page setting is correct. Look for text that starts or ends farther inward than nearby paragraphs. Check whether every line moves, only the first line moves, or only the later lines move.
Google’s help gives this route for hanging indents. Open Format. Choose Align & indent, then Indentation options. That is a paragraph control. Use it for a reference entry or another paragraph shape that needs it. Keep the page margin at the value required for the full file.
If you use the ruler, pause over the control and read its label before dragging. Small markers can sit close together. Follow a change with a check of the Page setup values and the affected paragraph. That tells you whether you changed the page boundary or the text shape you intended.
Avoid building an edge with repeated spaces or tabs. A row of spaces can look right for one line while the next line wraps elsewhere. Use the setting that describes the layout. Let the text wrap as you add or cut words.
For pasted content, compare one affected paragraph with a nearby clean one. Look for a distinct indent or manual padding. Repair that local cause first. A full margin change can hide the symptom. It can also move paragraphs that were already correct.
Treat header space as a separate layout choice
A large gap near the top of a page can involve both the page margin and a header. Google provides separate header and footer margin controls. Its help describes changing those values for a section or the full document. Read that scope as carefully as the body margin scope.
First decide which content should stay. A report may need a running project name above the main text. A cover page may have a different layout. Read that content before you reduce top space. Check that the page still has room for it.
If the running text is correct but sits in the wrong place, inspect the header settings. If the main content area needs a different boundary, inspect Page setup. After either change, read the top of the page from the paper edge down through the first body paragraph.
Check a later page too. A large title on the first page can make a layout look different from the rest of the file. Check that the header, title and body have enough room. Review them across the affected section.
If the goal is to remove a repeated header, treat that as its own edit. Techchahiye’s header-removal guide covers that task. Keep a margin change focused on spacing so that required page content remains easy to find and read.
Use the phone apps for the controls they document
Google’s current Android page-setup guide lists paper size, page color and orientation. Its iPhone and iPad guide lists the same choices. Neither guide documents the computer-style numeric margin fields. For a precise margin edit, use the computer route described above.
On Android, Google directs you to open the file, tap Edit, open More and choose Page setup. On iPhone or iPad, its route is More, then Page setup. Use those menus to review the listed choices. The app may have fewer controls than the computer version.
Both mobile guides describe Print layout. Open More and turn Print layout on to inspect the page view. That can help you notice a line that wraps badly or content close to a page edge. It is still worth checking the final output when a fixed layout matters.
If you must hand the task to someone at a computer, send a clear request. Give the document name, the values, the units and the scope. For example, ask for a change to the main report while keeping the appendix layout. That is more precise than asking them to make the text fit.
Check the file again on your phone after the edit. Make sure you are reading the expected version and the right format. A narrow screen is useful for reading the prose, while a full page preview helps you judge the fixed page layout.
Fix a margin change that seems to do nothing
When the result seems unchanged, check the format, scope and symptom in that order. First check for Pageless view. Then check the section scope and paragraph indents. Each can affect the result you see.
Reopen Page setup and read the saved values. Check the current section and any scope shown there. If the fields hold the values you entered, inspect the affected pages. Find whether the content edge moved and whether only one paragraph still sits inward.
If that paragraph remains out of line, review its indents. If the empty area is near a header, review that area. If content jumps to a new page, inspect breaks and paragraph rules. The visible symptom can help you choose the next control to inspect.
Make one change at a time. Then compare the same part of the file. If you change margins, font size and line spacing together, you lose a clear view of what helped. It becomes harder to restore the original layout if the result is worse.
For a file with many editors, agree on who will make the layout change. Ask the other person to review a specific page or section after the edit. Give each editor a clear part to review. This keeps the layout check focused.
Check the paper size and final print preview
Margins belong to a page size. Check both before printing or sending a fixed-layout file. A page that looks balanced at one size can need another review when its dimensions change. Read the requested paper size as part of the brief.
Google’s print help directs computer users to File, then Print. The next window contains the print settings. Compare that preview with the layout you intended. Look at the first page, a dense middle page and the last page rather than judging the file from its cover alone.
For Pageless files, Google gives a specific warning. Wide tables can be squeezed to fit, and images can adjust to page width during printing. Page features added earlier may also print while hidden in Pageless view. Switch to Pages when you need closer control of the printed layout.
Look for clipped content, crowded headings and tables with hard-to-read text. Check any page near a section change. A wider body area can change line breaks, while a narrower one can move content farther down the file. Inspect the places where the reader needs a clear start or ending.
Finally, open the actual file you will share. Read a few lines at normal viewing size. Check that required headers, page numbers and references are present. Keep the version you reviewed as the one you send so a later edit does not quietly change the layout again.
Did You Know?
Google says Pageless text width is a personal viewing choice. Changing it does not change a collaborator’s view. Use it to make reading more comfortable. Review a shared page layout in Pages format.
Conclusion
The most reliable way to change margins in Google Docs is to use Page setup on a computer. Read the units, choose Pages and apply the values to the right scope. Then review the indents and headers. Check the final output too. Start with the required page size and margin values, and make one clear layout change at a time.
FAQs
Should I use the same margin on all four sides?
Use the values required by the document’s brief. Equal margins may suit a simple report. Binding or a special layout may need more room on one side. Check all four fields. The table above uses example values. It shows the space each choice leaves.
Why does one paragraph still look narrower after I change the margins?
That paragraph may have its own indent. Check which lines sit inward and review the paragraph settings. A hanging indent, first-line indent and whole-paragraph indent create different shapes. Page margins define the outer content area, while a paragraph can have a narrower shape within it.
Can I set a margin for one page?
Google documents margin changes for chosen sections. A page that needs its own layout may need its own section boundaries. Inspect those boundaries and the Page setup scope before applying a local change. Then check the pages on either side so the intended layout does not extend beyond its target.
Can I save my page settings for future documents?
Google’s computer page-settings guide provides a Set as default choice in Page setup. Use it when you want those settings for new documents. Keep a note of the values you chose, and still check each new brief. A saved default may need to change for a later task.
Why does my printed file look different from Pageless view?
Google says Pageless printing can resize images and squeeze wide tables to fit a page. Some existing page features can also print while hidden in that view. Switch to Pages when the printed result needs precise control. Then inspect Print preview before producing the final copy.
References
- Google Docs Editors Help — Change page settings on Google Docs, computer
- Google Docs Editors Help — Change a document’s page setup, Pages or Pageless
- Google Docs Editors Help — Add page breaks and move margins
- Google Docs Editors Help — Lists and hanging indents
- Google Docs Editors Help — Use headers, footers, page numbers and footnotes
- Google Docs Editors Help — Change page settings, Android
- Google Docs Editors Help — Change page settings, iPhone and iPad
- Google Docs Editors Help — Print a file
- Techchahiye — Hanging indent in Google Docs
- Techchahiye — Remove headers in Google Docs
- Techchahiye — Delete an unwanted page in Google Docs
