

Frame the right content
Use a paragraph border for a short note, a table cell for grouped editable text or a drawing for a small design. Check spacing and the final page before sharing.
Key Takeaways
- Use a paragraph border for a note, quote or short block of normal text.
- Use a one-cell table when you want an editable box around several items.
- Use a drawing for a small design with shapes and text. It is a separate object.
- A box around some content is different from a frame that repeats on every page.
- Check the last line, page edges and final PDF before you share the file.
To add a border in Google Docs, choose the object you want to frame first. For a paragraph, open Format, choose Paragraph styles, then Borders and shading. For a larger text box, a one-cell table may fit better. A drawing gives you a shape-based design, but it holds its own text.
The choice matters when you edit the file later. A border that looks right around three lines may need a different layout around a full page. Start with the words and their purpose. Then choose a method that keeps them easy to read and change.
This guide follows the desktop steps in Google Help. It also covers design choices and fixes for common problems. A sample calculation explains the space around a border. The examples are illustrations, not reports from a device test.
Choose the right kind of border before you format
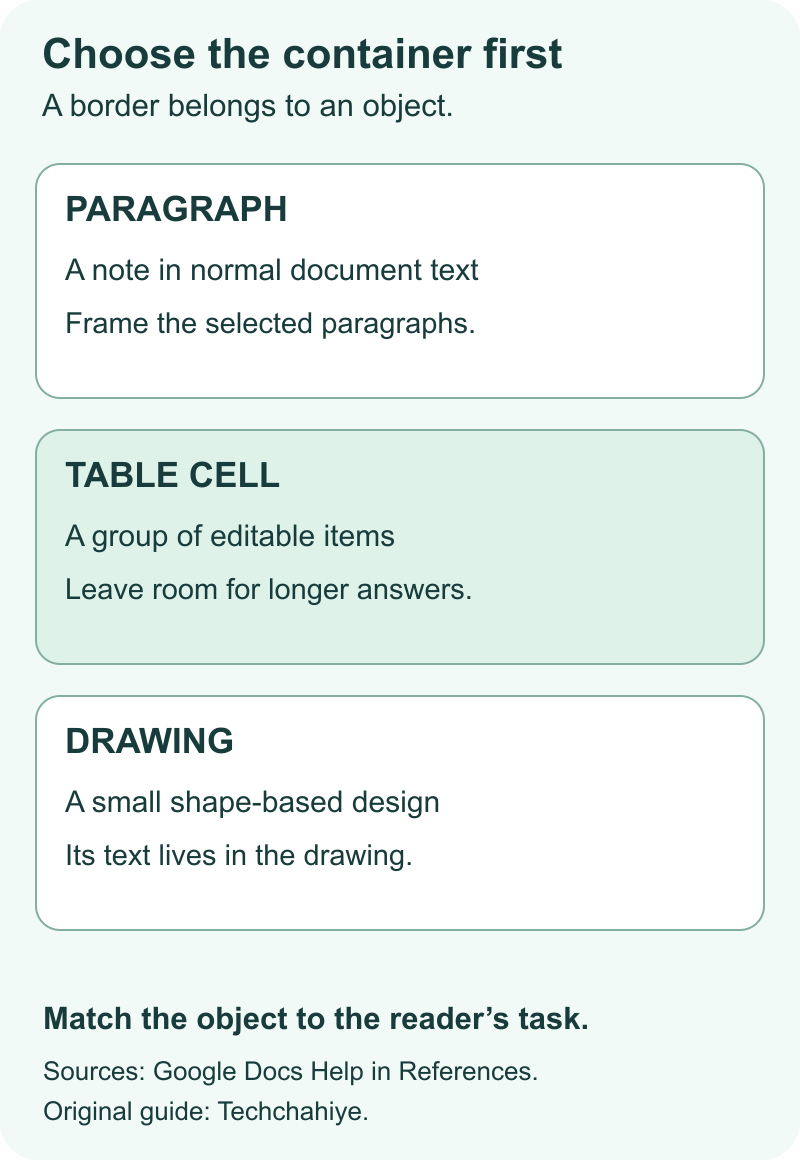
A border marks an edge. In a document, that edge can belong to a paragraph, a table cell or a drawing. These objects behave in different ways. Knowing which one you are editing saves more time than trying many line colors.
For example, imagine a meeting note with one action at the end: send the final file by Friday. A line around that paragraph can help readers find the action. You still want the words to remain part of the normal document. A paragraph border suits that purpose.
Now imagine a small form with a name, date and two questions. You want to keep those items in a single area. A table cell can act as the container. Readers can edit the text in the cell. You can change the border and the gap around the text.
A certificate-style title has a different need. You may want to place a heading and a small shape inside a rectangle. A drawing lets you arrange such objects on a canvas. Think of it as a small design within the document, rather than a frame around all nearby body text.
| Your goal | Start with | Check before sharing |
|---|---|---|
| Frame a short note | Paragraph border | Only the intended text has a border |
| Hold several editable items | One-cell table | The cell still has room to grow |
| Arrange shapes and a title | Drawing | The text is readable at its final size |
| Repeat a frame on many pages | A layout plan | Each page and export needs review |
Do not choose a drawing because it looks more flexible. Each extra object adds another place to make edits. For a plain note, the simplest suitable container is often the easiest one to maintain.
Also decide what the border means. It might mark a quotation, a worked example or an action. Use the same treatment for the same purpose throughout the file. A reader should not have to guess whether a box means “optional” on one page and “urgent” on the next.
How to add a border in Google Docs around a paragraph
Google’s paragraph-formatting help gives a direct route for normal text. Place the cursor in the paragraph, or select the paragraphs you want to format. Then use Format, Paragraph styles and Borders and shading. Choose the sides and line style you need, and apply the change.
Start with one short paragraph while you decide on the design. Keep its wording complete enough to stand on its own. A label such as “Example” can help, but it should not replace the sentence that explains the example.
For an all-around box, choose the outer sides. If you want only a visual cue, a single side may be enough. A line beside a note takes less visual space than a heavy frame around every edge. Pick the treatment that matches the importance of the text.
Before you close the options, look at the gap between the words and the line. This gap is padding. Without enough room, the text can feel squeezed even when the font is clear. Choose a gap that makes the text easy to read. There is no required size for every note.
After applying the border, read the entire paragraph again. Check the first and last words, not the edge that changed. If you selected several paragraphs, check the whole framed area. It should contain only the intended note.
Avoid adding blank paragraphs to move a border. Empty lines may look like space, but they also become content to manage. Prefer the available paragraph spacing and border settings where they fit the task. That makes your intent clearer when someone else edits the file.
Set line weight, spacing and color with a clear purpose
A border should support the message. A thick dark frame around a short reminder can make it seem more urgent than the text warrants. A faint line may disappear when you print the page. Choose the line after you know where the document will be read.
For a draft viewed on a screen, start with a simple dark line on a plain background. Then read the box at a normal zoom level. If you need to zoom in to separate the words from the edge, adjust the layout before you add more decoration.
Use color as a second cue. For instance, give the box an “Action” heading. The label still works when a reader cannot tell its color. A color-only system asks the reader to remember a code. A short label states the purpose directly.
Keep text contrast separate from border contrast. Dark text on a pale fill can be clear, while a pale border may still be hard to see. Look at both. If the border marks an important note, check its edge in the final output. The line should still be clear.
For a long document, write down a small style rule before you format every note. A useful rule might be: one line style for examples, the same amount of inner space and a short heading in each box. This is an editorial choice, not a rule from Google.
Then use the rule consistently. If you later decide to change the design, you have a clear target. You can review each box against that rule instead of trying to remember how the first page looked.
Use a one-cell table for a larger editable box
A table can hold more than a grid of figures. Google documents a table route through Insert and Table. Choose one row and one column to create a single cell. Put the content in that cell, then use the table’s border controls to style its outline.
This method can suit a short form, a grouped example or a note with several paragraphs. Keep the content together because the reader needs that grouping. Do not put the whole article into a table merely to draw an outer line.
Google’s table help also describes cell padding and size controls in Table options. These let you adjust the space around the contents. Change one setting at a time so you can see which choice solves the problem.
For example, if the text touches the left edge, inspect the inner space first. Making the whole cell wider may not solve a narrow inner gap. If one line is much longer than the others, read that line for a possible edit before changing the page layout.
Next, check how much text the box needs to hold after future edits. A form that fits a one-word sample answer may need more space for a real answer. Write a longer sample while you review the design. Label it as sample text and remove it before sharing the final form.
Avoid using repeated spaces to line up items inside the cell. They can make the file harder to edit. Use clear paragraphs or an actual table structure when you need several fields. A border can group content, but it cannot fix unclear labels or an awkward form.
Build a small border design in a drawing
Google’s drawing help describes Insert, Drawing and New as the route to a new canvas in Docs. Within that canvas, you can add a shape and a text box. Arrange the frame and words there, then place the finished drawing in the document.
This can suit a short certificate heading or a small badge-like panel. Keep the design compact. Keep the message clear in the document. Readers should not need to open the drawing to read tiny text.
The important limit is where the words live. Text placed in the drawing belongs to that object. A rectangle on the canvas stays in that drawing. It does not frame the normal paragraphs outside it. Plan the drawing as a self-contained design.
Before you build it, sketch the message in plain text. Decide on the heading, any supporting line and the space each needs. Then add only the shapes that help explain that message. More shapes do not make a basic announcement more useful.
Keep a separate plain-text copy of important wording in your working notes. This helps you compare the design with the approved message. It also makes it easier to spot a missing date, a misspelled name or a line that changed during layout work.
Once the drawing is in place, check it at the size readers will see. A design that looks clear on a large editing canvas may need less text in the document. Shorten the message or make the design larger; do not rely on readers zooming in.
Plan a page-style frame without trapping your text
A frame around a page has a broader job than a box around a note. It must fit the paper, margins, headers and body text. If the file has several pages, each one also needs to work after edits. Treat this as a layout task, rather than assuming that one rectangle will solve it.
Google separates pages and pageless layouts. Its page-break help says you need pages format for page and section breaks. If you plan to print the file, first view it in pages format. Then judge the design. Otherwise, the editing view may not answer your questions about page edges.
Start by deciding whether you need a page frame at all. A cover page may work with a single framed title and open space below. A long report may be easier to read with a consistent heading style and no outer frame. Choose the treatment for the reader’s task.
If a school or workplace gives you a template, inspect that file before rebuilding it. Its page size and spacing may be part of the submission rules. A new decorative border should not push text into a forbidden margin or hide a required page number.
For a multi-page design, review at least the first page, a full middle page and the last page. Those pages often have different amounts of text. A short last paragraph can reveal a spacing problem that a full page hides.
Finally, keep a clean copy before major layout changes. This gives you a clear comparison point if a box grows, a heading moves or the final PDF looks wrong. Compare the two versions side by side. This is easier than trying to recall each small change.
Work out how much space the border leaves
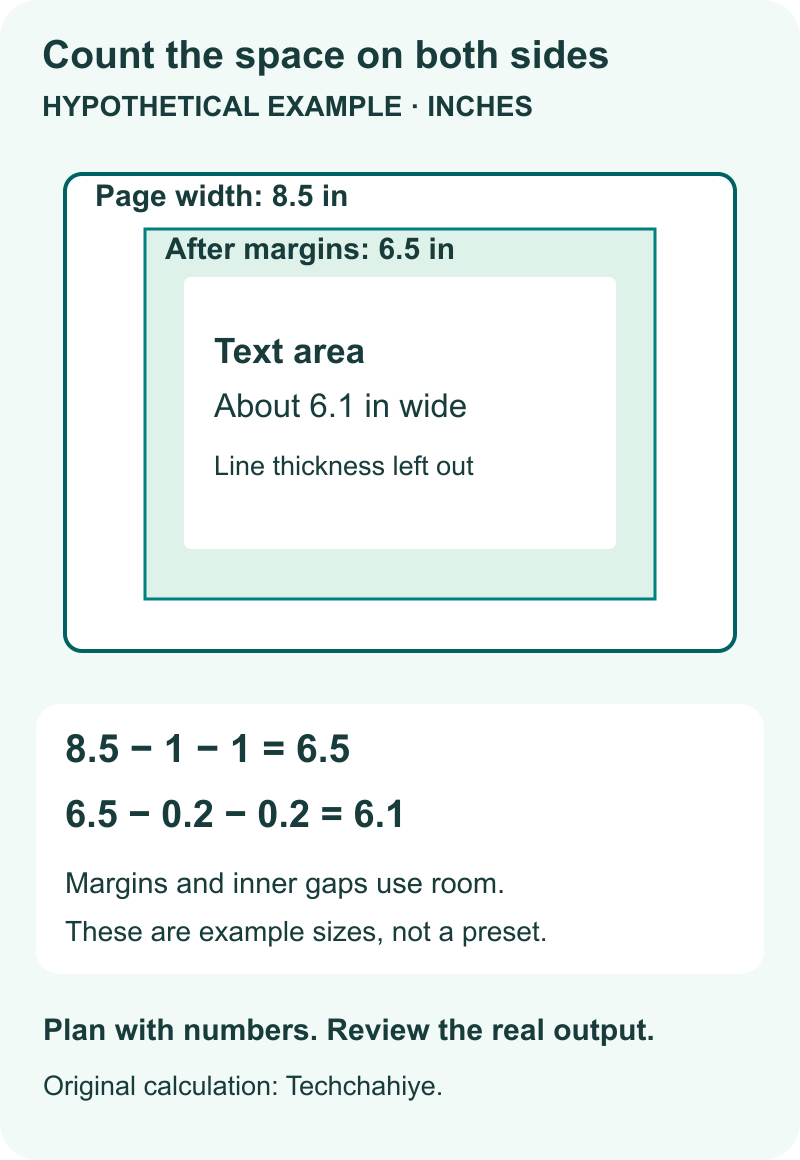
An outer line uses little room, but the space around it can still affect the text area. Separate the page margin from the padding inside a box. A margin is space toward the page edge. Padding is space between a container’s content and its border.
Here is a hypothetical planning example in inches. It is not a Google Docs preset or a claim about your printer. Suppose your chosen page is 8.5 inches wide. You plan 1-inch margins on both sides. That leaves 6.5 inches between those margins: 8.5 minus 1 minus 1.
Now suppose a box fits within that 6.5-inch area. You allow 0.2 inch of inner space on each side. The remaining text width is about 6.1 inches: 6.5 minus 0.2 minus 0.2. For this simple illustration, we leave line thickness out of the calculation.
The point is not to copy those figures. It is to count both sides. Adding room on the left and right reduces the text width twice. A small change can make a long heading wrap. This matters when the title nearly fills the space.
Use the calculation to plan, then judge the actual output. Fonts, line breaks and table settings still affect the result. A neat calculation is only a plan. It cannot tell you whether the box is easy to scan. You still need to look at the final line.
If the content no longer fits, decide what can change. You might shorten the heading, reduce decoration or use a simpler container. Do not shrink all the body text to preserve a border. The message deserves more space than its frame.
Fix the border by finding the object first
When a border looks wrong, first identify what owns it. Click in the text, table cell or drawing and use that object’s controls. Changing page margins will not directly fix every kind of inner gap. Moving a drawing will not change a paragraph border.
If too much text has a border, check the selected paragraphs. The border may be correctly applied to the wrong range. Read the nearby heading and the paragraph after the note. They should remain outside the box if they have a different purpose.
If the border crowds the words, inspect the inner space. Then review the longest line. A large unbroken item, such as an example identifier, may need a clearer presentation. Do not insert random spaces into an address or code simply to make it fit.
If a table becomes awkward near a page edge, review its row settings. Google documents an option to control whether a table row can split across pages in pages format. Check that option when a grouped box breaks in an unwanted place. Then inspect the page before and after it.
If a drawing seems to have lost words, open the object and compare its text with the intended message. A drawing’s frame and its text box are separate design elements. Keep both in view while you adjust them.
If a border disappears in a printout, compare the exported page with the printed one. That helps you locate the stage where the result changed. Check page size and preview before making another design change. Do not assume the document needs a thicker line when the real problem is the output layout.
Review and remove borders without losing the message
Before you share the document, read the boxed content without looking at its design. Is the action clear? Does the example say what it illustrates? A border should make a useful passage easier to find, not make a vague passage seem more complete.
Then review the visual hierarchy. A page with many equally strong boxes can make every item compete for attention. Keep the strongest treatment for the content that needs it most. A short heading may do enough work for the rest.
To remove a paragraph treatment, choose Reset in the border options. This is the removal method in Google’s help. For a table, distinguish removing the outline from deleting the table. Deleting the container can also remove its contents. Copy out any text you need before choosing a destructive edit.
For a drawing, check whether the frame alone needs to go or whether the whole object is no longer useful. Keep the wording available before removing the design. This helps when a date, name or instruction appears only in that box.
Finish by exporting or printing a preview through the normal document controls. Check each page, the edges of the box and the final line inside it. If page spacing is still wrong, use the Techchahiye margin guide in References. Stop adjusting when the file is clear, consistent and ready for its purpose.
Did You Know?
Google’s paragraph border controls can add a line between paragraphs. They also include outer sides. That can help separate items in a selected group. Decide whether you need an outer frame, an internal divider or both before applying the style.
Conclusion
Choose how to add a border in Google Docs based on what the border needs to hold. Use paragraph formatting for normal text. Choose a table cell for grouped editable items, or a drawing for a small design. Then check the real reading size and final page output.
Start with one useful passage. Give it clear wording, enough inner space and a simple frame. Once that example works, use the same design rule for similar content throughout the file.
FAQs
Can I put a border around only one paragraph?
Yes. Place the cursor in that paragraph and use the paragraph border controls. If you select more text, check that the selection includes only the paragraphs you want to frame. After the change, check the nearby heading and next paragraph. Make sure only the intended text has a border.
Is a table border the same as a page border?
No. A table border belongs to the table’s cells. A one-cell table can create a box around its contents, but it does not become an automatic frame for every page. Choose it when you need a container for content. Then review how it fits on the page.
Why is the text too close to the line?
The box may need more inner space. Check paragraph padding or the table cell’s padding, depending on the method you used. Also read the longest line for an awkward wrap. Widening a page margin or making the font smaller may change the wrong part of the layout.
Should I use a drawing for a long report?
Use drawings for small designs with shapes and text that you place on a canvas. Normal report paragraphs are usually easier to maintain as document text. A drawing can hold a short framed title. It does not become a live border around nearby body paragraphs.
What should I check before printing a bordered document?
Check the chosen paper size, page layout, border edges and final line in each box. Then compare the PDF or print preview with the document. Inspect pages with different amounts of text. A frame that suits the first page may need changes on a crowded or nearly empty page.
References
- Google Docs Help — Change how paragraphs and fonts look
- Google Docs Help — Add and edit tables
- Google Docs Help — Learn how to use drawings and markups
- Google Docs Help — Add page breaks and move margins
- Google Docs Help — Change a document’s page setup: pages or pageless
- Google Docs Help — Print a file
- Techchahiye — How to change margins in Google Docs
