

Choose a typing setting or a text edit
Use Automatic capitalization for typing behavior. Use the Capitalization menu for selected text. Check a fresh sample and preserve valid names and acronyms.
Key Takeaways
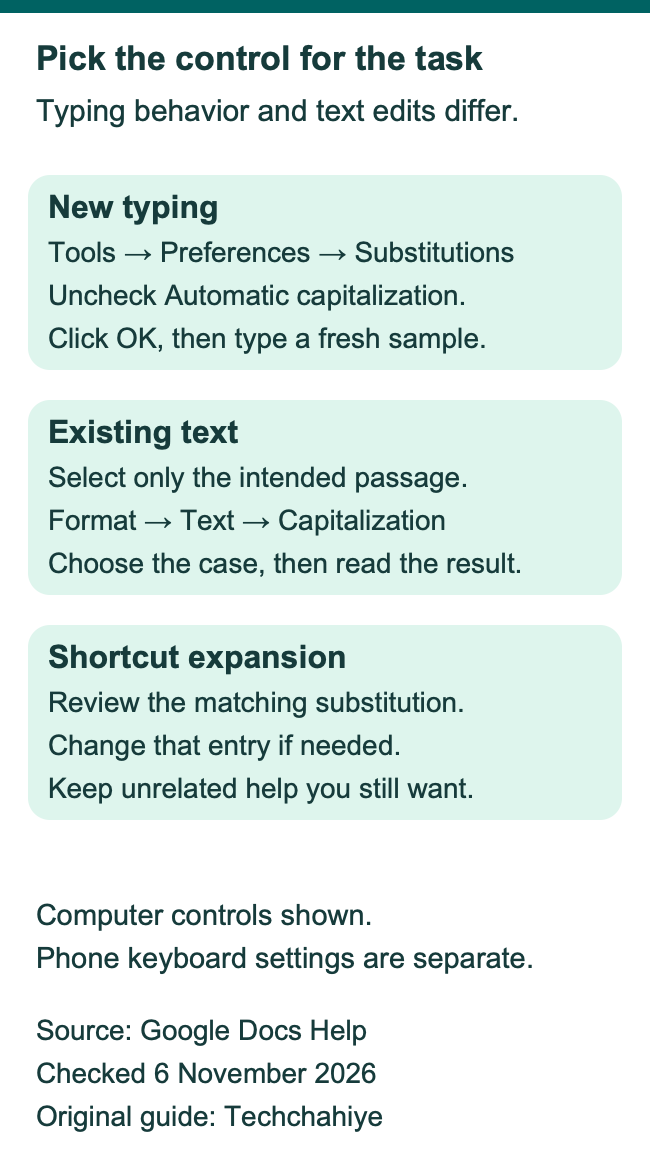
- On a computer, open Tools, Preferences, then Substitutions. Uncheck Automatic capitalization and click OK.
- Change only the control you need. Automatic substitution and spelling corrections have separate jobs.
- To change existing selected text, use Format, Text, Capitalization instead.
- Google says you can manage the Docs Autocorrect setting on a computer, not in its phone or tablet apps.
- Check a fresh typed sample, then review any old text that still needs a manual edit.
To turn off auto caps in Google Docs, use a computer. Open Tools, then Preferences, then Substitutions. Uncheck Automatic capitalization and click OK. That is the route in Google’s current Autocorrect Help, checked on 6 November 2026. Keep other correction choices on if you still want them.
The important choice is what you want to change. You may want future typing to keep the case you enter. Or you may need to fix a paragraph that already has capital letters. Those are different tasks, with different controls.
This guide helps you choose the right one and check a small sample. Keep capitals in names or acronyms that need them. The examples are hypothetical editing exercises. They do not claim a test of your account, keyboard or document.
Turn off auto caps on a computer
Google’s current instructions place the control under Tools, Preferences, Substitutions. Look for Automatic capitalization. Clear that checkbox, then choose OK. Read the label before changing a neighboring option.
Do you want to stop capital changes while keeping spelling help? Focus on that one control. Google’s Autocorrect page lists capitalization, spelling corrections and link detection as choices. Turning off all the tools changes more than this task needs.
Use the live labels in your current Preferences window. A screenshot in an older tutorial can show an earlier arrangement. The useful match is the Automatic capitalization function in Google’s documented Preferences route. If your screen differs, compare it with the current Help page in References.
After saving the setting, check new typing in a harmless practice area. Enter the kind of line that caused trouble. Inspect what happens after you finish the word or sentence. Use the result to decide whether this was the control affecting your work.
Decide whether the problem is new typing or old text
A setting and a text edit solve different problems. A preference changes an auto behavior. A case command acts on selected text. Keep that distinction clear before changing the whole document.
| Your goal | Start here | Check afterward |
|---|---|---|
| Keep the case of new typing. | Auto caps in Preferences. | Type a fresh sample. |
| Lowercase an existing phrase. | Select it, then use Capitalization. | Read the changed phrase. |
| Fix one wrong correction. | Edit the affected word. | Check the full sentence. |
| Stop a shortcut from expanding. | Review that substitution entry. | Try the same shortcut again. |
Suppose you need a lowercase label in a project note. If that label already has a capital letter, inspect and edit the existing text too. Test the typing preference with new input. An unchanged old paragraph cannot answer that question on its own.
The reverse mistake also causes confusion. A selected-text edit changes that passage. Check future typing with new input. Use a fresh sample for that question. The table gives each task its own result to inspect.
Change existing text with the case menu
Google’s formatting help gives a separate route for text case. Select the text, open Format, then Text, then Capitalization. Its choices include lowercase, UPPERCASE and Title Case. Choose the form that matches the selected material.
Start with a phrase rather than selecting the whole file. Read the change in context before applying it to more text. Does only the heading need lowercase? Keep the selection inside it. Leave names in the following paragraph alone.
Here is a hypothetical editing choice. A section label says “PROJECT NOTES,” while your preferred label is “project notes.” Select that label and use lowercase. Then inspect the next line. It should still contain the wording and case you intended for that separate line.
Avoid treating Title Case as a complete editorial style guide. Read the actual result and check your own heading style. Software can change letter forms. You still decide how names and quoted titles should appear.
Keep useful capitals when cleaning up a draft
A lowercase writing style does not mean every capital letter is wrong. A project draft may contain a person’s name, a country name or an acronym. Decide which parts follow your chosen style before applying a broad text change.
Imagine a hypothetical note with three items. It has a casual heading, the acronym USB and a person’s name. You might want the heading in lowercase while keeping the other two as written. Select the heading alone. Check all three items after the edit.
Use the original source for names that matter. Compare an author’s name with the publication, or a model name with the product record. A tidy page can still contain an incorrect name. Changing text case is not a fact-checking method.
For shared work, write down the style choice in ordinary language. “Lowercase section labels; preserve names and acronyms” gives another editor a clear rule. A later reviewer can use the rule too. They can tell the intended style from an accidental change.
Keep substitutions separate from capitalization
Google’s Autocorrect Help describes more than one control. It covers the substitutions list and each automatic function. You can disable a specific substitution or remove it. It also documents a checkbox for all automatic substitutions.
Think about the visible symptom. Did one letter change case? Did a short entry expand into a longer phrase? Or did a web address become a link? Write down what changed. That description helps you choose a control with the same job.
For a hypothetical example, you type a short label that expands into an unwanted phrase. Review the matching substitution entry. Clearing Automatic capitalization would address a different function. Compare the exact input with the resulting text before changing several preferences.
Keep a note of the setting you changed. If you later want that substitution back, you can review that specific choice. A record such as “disabled this one shortcut” is easier to understand than “turned off all writing help.”
Keep spelling suggestions if they help you
Google’s spelling and grammar help lets you accept or ignore suggestions. It also describes a personal dictionary. Add valid words there so Docs can recognize them. Those tools can help with a recurring valid name or term.
Use that distinction when one unusual word keeps drawing attention. If the spelling is correct, check it against its source. Then decide whether a personal dictionary entry suits the task. That is a different decision from stopping auto caps in ordinary typing.
For a hypothetical class project, you may use a local place name several times. First verify the spelling from a reliable record. Add it to the personal dictionary if you want Docs to recognize it. Keep reviewing the rest of the sentence for errors that the name check does not cover.
You can also ignore a suggestion without declaring every future suggestion wrong. Review the actual word and context. Keep the writing help you find useful. Change the behavior that interferes with your text style.
Check the document language before diagnosing odd corrections
On a computer, use File, Language for the typing language. That is the route in Google’s language guide. Check that choice when a draft uses a different language from the one you intended. Do not change it merely to suppress one inconvenient capital letter.
The current Autocorrect page lists supported languages for that feature. Its list includes English, French, German, Portuguese and Spanish. That is a feature-specific list. Do not assume the same rules apply to every translation or voice feature in Docs.
For a bilingual draft, note which part of the text you are checking and what language you expect. Keep the original wording available. If you change the language, record that step on its own. Keep it separate from the automatic caps preference.
This matters when reporting a problem too. Describe the exact change and chosen language. For example: a word changes after you type a space. That is clearer than a report about everything changing. Include a harmless sample that shows the behavior without exposing private text.
Understand the phone and tablet boundary
Google says the Docs Autocorrect control in this guide is manageable on a computer. Its Help explicitly excludes Android, iPhone and iPad from that control. Use a computer for the documented Preferences change.
On a phone, a keyboard can have its own text settings. Identify which keyboard you are using before looking for its instructions. Both tools can affect typed words. Their settings can still have different scopes.
Use a small observation to narrow the question. Does the same input change in a plain note in another app? Or does it change only in one document context? Record the app, keyboard and result. Treat that as a diagnostic clue rather than proof of a particular cause.
This guide does not supply a universal phone toggle. Device makers and keyboards have their own controls. Follow the current official instructions for the keyboard you actually use. Then check a new sample in the app where the problem occurred.
Separate typed input from voice input
A spoken draft and a keyboard draft can involve different controls. Google’s voice-typing help describes its own dictation and editing workflow. Use that feature’s instructions when the capitalized text comes from speech.
Techchahiye’s voice-typing guide covers the desktop route. It explains microphone access and a review routine too. Keep those steps separate from the checkbox in this article. A working microphone answers one question. It does not establish what a typing preference will do.
For a hypothetical comparison, type one harmless sentence and dictate a separate one. Inspect each result without changing several settings between them. Note the input route beside the sample. That helps you describe what you observed if you need support.
You do not need to force one method to behave like another. Choose the route that suits the job, then edit the final text. Names, acronyms and sentence meaning still need review. That applies to either input route.
Find unwanted variants without replacing everything
Google’s Find and replace tool offers a Match case option. On a computer, open Edit, then Find and replace. Use the exact form you want to locate. Review matches with Next or Prev before deciding on a replacement.
Take a hypothetical product note with a USB reference. You need to find “USB” and leave a lowercase label alone. Match case helps narrow the search to the form you entered. Read each match in context. Do not assume all matches serve the same role.
Google distinguishes Replace from Replace all. The first applies to the highlighted occurrence; the second applies throughout the matches. Start with one occurrence when the document mixes headings, prose and names. Read the changed sentence before choosing a wider edit.
Avoid complex pattern replacement for a simple case cleanup. Google’s Help notes different regular-expression replacement limits in Docs and Sheets. A formula from a spreadsheet tutorial may not behave the same way in a document. Use the smallest clear operation that answers your actual need.
Review changes before restoring an older version
Did a broad edit change too much text? Inspect what happened before making another broad change. Google’s version-history help lets editors view earlier versions and see changes. You need editing permission to browse those versions.
Use history to compare the affected text with an earlier state. Read the current version too. A collaborator may have added useful material after the version you are considering. Restoring a whole version is a larger action than correcting one heading.
For a hypothetical shared report, a lowercase edit affected both headings and acronyms. Another writer then added a new paragraph. You might need a targeted correction to the acronym while keeping that paragraph. Inspect the versions before deciding which recovery action fits.
Keep recovery and preference changes as separate steps. First establish the current text you want. Then check the auto setting for future typing. This gives each problem its own step. Fix the current text, then check the preference for new input.
Use a small check that matches your goal
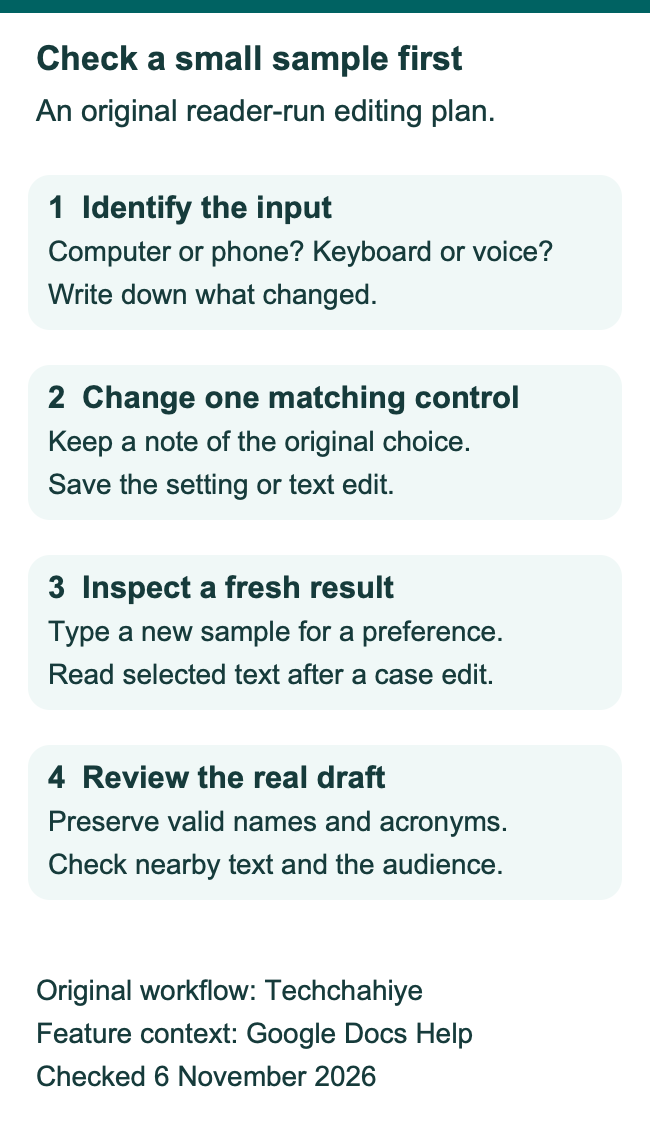
Write a sample plan before changing the setting. Choose a line start, a sentence after a period and a valid name you want to preserve. These are reader-run examples. They are not a claim about which exact inputs trigger every version of Docs.
Record the starting text, change one control and type the sample again. Compare the two results. Check the current document and account context as well. If nothing changed, record that result. Use further checks to establish the cause.
Next, inspect the actual work. Does the new line keep your intended style? Do names and acronyms still read correctly? Have you retained spelling help you wanted to keep? A clear success check covers both the desired change and the useful behavior around it.
If you later want auto caps again, return to the same documented control. Review its checkbox and save the choice. Test a fresh sample once more. Check the visible result of each step. An old paragraph cannot show every preference change.
Explain a remaining problem clearly
If the behavior still differs from what you expect, gather a short, harmless example. Note the computer or phone, browser or app, keyboard or voice input, and the exact text change. Include the setting label you changed and whether you saved it.
For a useful report, describe the sequence. “I typed this lowercase word, then a space, and this form appeared” is specific. “It changes my writing” is harder to investigate. You can provide the sequence without sharing a private report or a whole document.
If a work or school policy affects your setup, ask the appropriate support team. Keep the existing account permissions. Establish the cause before adding a writing extension. Establish which tool supplies the change before adding another tool to the chain.
Keep the final document as your main result. A preference change is useful when it supports the writing task you chose. Review the saved wording and intended audience before calling the job finished.
Did You Know?
Google gives selected-text case changes its own menu under Format, Text. That menu and the Automatic auto caps setting do different jobs. Choose the one that fits the task. That can leave the draft intact when only future typing needs attention.
Conclusion
Turn off auto caps in Google Docs through the computer’s Automatic capitalization control. Keep other correction choices if they help you. Use the case menu for existing selected text. Check a fresh sample. Preserve names and acronyms. Review the finished draft before sharing it.
FAQs
Will turning off the preference lowercase my whole draft?
Use the preference for auto typing behavior. For existing text, inspect the affected passage. Use the selected-text case menu if needed. Check old text and new typing as separate tasks. A fresh sample gives you a clearer check of the preference.
Can I manage this Docs setting on an iPhone or Android phone?
Google’s Help says this Docs Autocorrect control is manageable on a computer. It excludes its phone and tablet apps. A mobile keyboard has separate settings. Identify your actual keyboard. Follow its official instructions to check phone input.
Should I turn off all automatic substitutions too?
Only if that is the behavior you want to change. A substitution can expand or replace an entry. The auto caps setting concerns capitals. Read the symptom and the matching setting label. Keep unrelated useful controls on when they still suit your work.
How can I keep a valid name from appearing as a spelling error?
Verify the name first. Google’s spelling help documents a personal dictionary for valid words. Consider that option or ignore the specific suggestion after checking it. A spelling suggestion and an unwanted automatic capital change need different checks.
What should I check before using Replace all?
Inspect matches in context, including headings, names and acronyms. Use Match case if the exact letter case matters. Start with a single replacement when different occurrences have different roles. Review the result before applying a change throughout the file.
References
- Google Docs Help — Manage Autocorrect
- Google Docs Help — Change text case and formatting
- Google Docs Help — Spelling suggestions and personal dictionary
- Google Docs Help — Document typing language
- Google Docs Help — Find and replace, including Match case
- Google Docs Help — View changes and earlier versions
- Google Docs Help — Voice input and editing
- Techchahiye — Use voice typing in Google Docs
- Techchahiye — Strikethrough in Google Docs
