

Fix the cause of an unwanted page
Use visible marks to find the cause. Check breaks, paragraph rules and page settings. Then review the file your reader receives.
Key Takeaways
- Find what creates the extra page before you start deleting text.
- Show non-printing characters to reveal blank paragraphs and breaks.
- Check paragraph rules and page settings when there is no clear break to remove.
- Review the final print or PDF output after the page is gone.
You finish a document, open the print view and find an empty page at the end. Pressing Backspace seems to do nothing. Or it removes something you meant to keep. The page looks empty, but its layout still has a cause.
To delete a page in Google Docs, remove the content, empty paragraphs or break that creates it. Google gives a way to remove a manual page break. Click beneath it. Press Backspace or Delete until the break is gone. First turn on Show non-printing characters in the View menu so you can see what you are changing.
There is a second kind of problem: text that moves because of spacing or a page rule. That needs a settings change rather than more deleting. This guide helps you find the cause. Make a small repair, then review the output. Keep all the content your reader needs.
Start with the page’s cause
Text, objects and layout choices form the page. An extra page can come from a break or spare paragraphs. The content may also be too long for the space. Treat the visible page as a clue rather than the item you must somehow select.
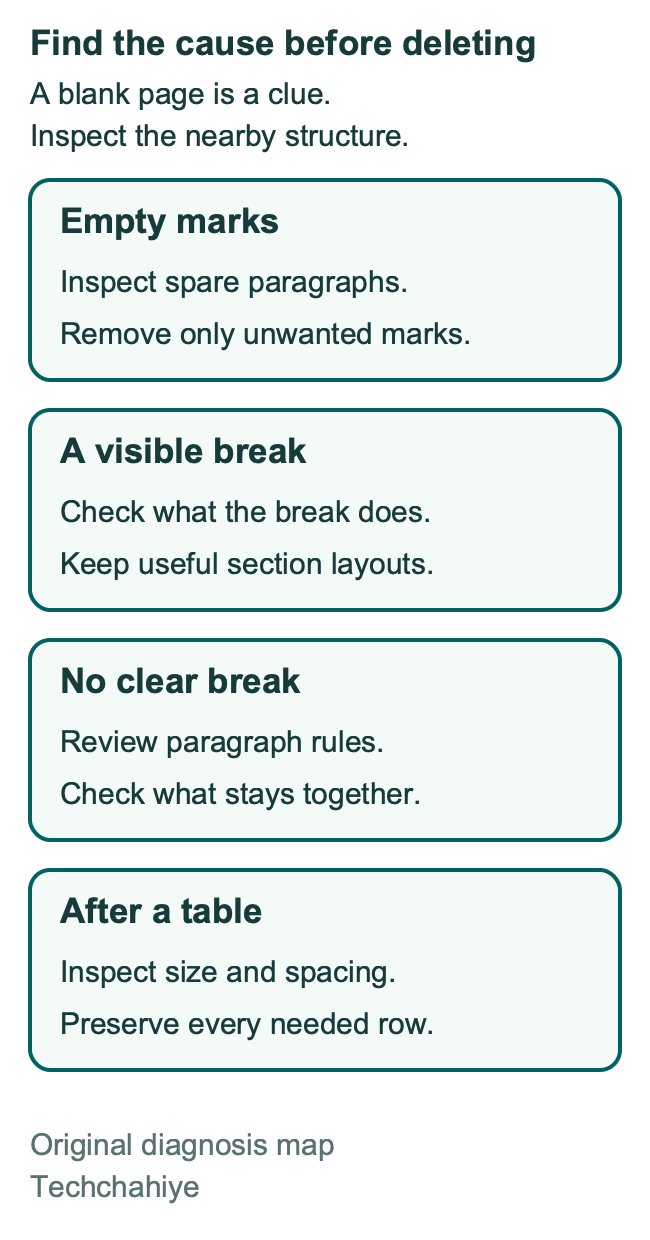
Look at the page before and after the gap. Where does the text stop? Where does it begin again? Is the extra page at the end, between two chapters or after a large table? Those details tell you where to start.
Do not select a wide stretch of text because the white area is hard to click. A broad selection can include the last sentence on one page and the first sentence on the next. You may remove the empty space and useful writing together.
Use the smallest change that matches the cause. One spare paragraph calls for a small deletion. A heading set to start a new page calls for a review of that rule. A report that is a little too long calls for a content or layout decision.
| What you see | First thing to inspect | Goal of the repair |
|---|---|---|
| Empty page at the end | Last paragraph marks and breaks | Remove only unwanted empty content |
| Blank page between sections | Page or section break near the gap | Keep the intended section structure |
| Text jumps with no visible break | Paragraph spacing and page rules | Find what keeps the text together |
| A table nearly fills the last page | Table size and nearby paragraphs | Keep the data while improving the fit |
| Editor and PDF disagree | Actual page setup and export choices | Review the file the reader receives |
Keep a useful starting copy
Before you repair a complex report, make a copy. Google’s file help documents File, then Make a copy. Name it for the task, such as “Report page cleanup.” A clear name is more useful than leaving several files called “Copy of report.”
A copy helps with a shared file or a complex layout. Keep one if the report has many tables or sections. You can compare the repaired version with the original without relying on memory. Keep the source file available until you have checked the result.
Write down what you are trying to fix in one sentence. For example: “Remove the empty last page without moving the signature block.” This keeps the repair focused. The signature block may need its own page. That is a content choice. It does not mean the software has failed.
Ask the person who owns the layout before changing its meaning. A short handout may not need the blank page. A longer report may use it to mark a section. Do not assume that every white area is waste.
If you make a wrong change, pause before adding more edits. Google’s version history help explains how to inspect earlier versions and make a copy of one. Browsing that history needs edit access. Use it to compare changes when needed, rather than trying to rebuild a lost passage from memory.
Reveal the marks that shape the page
On a computer, choose View and Show non-printing characters. Google says the blue marks show breaks. They also reveal tabs and spaces. You can inspect the type of each break. Open that view before you decide that an area contains nothing.
Find the last visible text before the unwanted page. Move through the nearby marks slowly. A group of empty paragraph marks is different from a labelled break. The first adds repeated empty content; the second records a layout decision.
If you see several spare paragraphs at the end, select only the unwanted marks and delete them. Keep the final sentence outside the selection. Then check whether the empty page is gone. Repeat with another small selection only if there is still a clear group of unwanted marks.
A line break within a passage may serve a purpose. It can separate lines in an address or a short verse. Do not remove every mark of the same type across the document. Repair the specific area that creates the problem.
The marks are a diagnostic view. You do not have to leave them visible for normal writing. Google documents the same menu choice for hiding them again. Look at the end of the repaired passage. Check which marks remain before you hide them.
Remove an unwanted manual page break
Use a manual break when a new part needs a fresh page. It can also be left behind after the text around it changes. If you find one at the unwanted gap, decide whether it still has a job.
Google says to place the cursor below the page break. Then use Backspace or Delete. Stop when the break is gone. Do not hold the key down while watching for the page count to change. The next character may be useful text.
Check the sentence on each side of the former break. Did they become one paragraph when they should remain separate? Did a heading lose the space it needs? Keep the intended reading order after the repair. Check more than the page count.
For example, imagine a workshop handout with a manual break before “What to bring.” The earlier section becomes shorter after an edit. The break may now create a mostly empty page. If “What to bring” can follow the earlier section, removing the break may be a sensible choice.
A different handout may need each exercise on a separate sheet. In that case, the break still serves the reader. Keep it and accept the space, or redesign the content with that goal in mind. A smaller page count is not always a better document.
Review a section break before removing it
Google’s break guide distinguishes page breaks from section breaks. Sections can have their own page choices. Its page settings guide also describes different orientations within one document. A break near an empty page may be part of a wider layout.
Use Show section breaks in View when you need to see those boundaries. Check the pages on both sides. Look for a change in orientation, margins or the type of content. A wide table between portrait text sections is a reason to slow down.
Do not use a mass deletion to clear all section breaks. Work on a copy and inspect one boundary at a time. After any change, compare the nearby page layouts with the original. If the removal changes a page you meant to preserve, undo that step and reconsider the plan.
For an imported file with many sections, a simple record helps. Note the page where the gap appears and what starts after it. Then note the result. For example: “Gap removed. The next page stays in landscape.” The note is a check you can verify, not a claim that all section problems share one fix.
If you cannot tell why a boundary exists, keep the original and ask the document’s owner. You do not need to dismantle a working report to discover which part controlled it.
Check paragraph rules when the page has no clear break
A gap may have no break character to remove. Google lists three rules that affect text flow. They are Keep with next, Keep lines together and Prevent single lines. These controls appear under Format, then Line and paragraph spacing in Pages format.
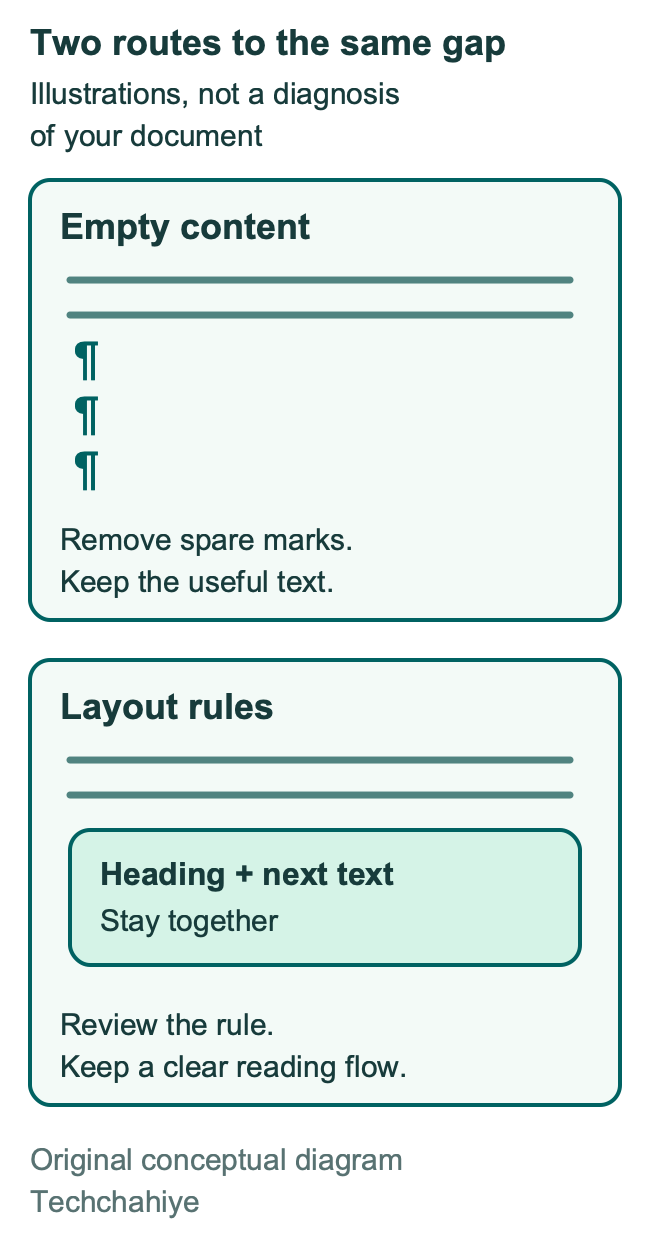
Each option has a purpose. A heading can stay with its next paragraph. That avoids leaving it alone at the page end. Keeping a paragraph’s lines together can stop that paragraph splitting across pages. Protecting the first or last line can also change where a passage fits.
Select the affected paragraph and inspect the active choices. Change a rule only if it does not suit the content. Removing all rules may fix one gap. It can also leave awkward headings elsewhere.
Consider a heading followed by a short introduction. If they need to stay together, some unused space before them may be the right result. Now consider several body paragraphs all set to stay with the next. Review whether you need that chain.
Google also lets a paragraph start on a new page. Check that choice when a heading insists on starting on a new page. If the heading belongs there, keep it. If the rule came from an old design, change it and review the new position.
Fix excess spacing without flattening the document
Paragraph spacing and blank paragraphs are different tools. Google provides line spacing and custom space before and after paragraphs. When you inspect a wide gap, look at both the content marks and the paragraph’s spacing settings.
Do not select the whole file and apply a tiny font or tight spacing as your first repair. A report may contain headings, captions, lists and notes that need different treatment. Broad changes make it harder to tell which setting caused the original problem.
Work on the affected passage. Check whether it has an unusually large gap after it. Compare it with a similar passage that looks right. Use that passage as a guide within your file. Avoid a random value from another document.
Here is a hypothetical space calculation. Suppose a passage has ten unwanted blank lines. Each uses about 12 points of vertical space. They would use about 120 points, or 1.67 inches, using the 72-points-per-inch conversion. The actual space depends on the font and paragraph settings. The example shows why a few empty returns can have a large effect.
Use that idea to inspect the page, not to set a target line count. Remove the unwanted empty content or adjust the one setting that does not fit. Then read the passage to see whether it still has enough space to scan comfortably.
Check paper size and margins
Google’s Page setup controls include paper size, orientation and margins. The file may use a different paper size. Check how its content fits the sheet you need. Review those settings before you blame a blank page on the text alone.
Set the paper size to the output you need. Use the sheet size your reader needs. Avoid changing it only to cut the page count. A neatly packed file can still print poorly when its settings do not match the job.
Margins define the room available for the content. Imagine an 11-inch-tall page. Give it 1-inch top and bottom margins. That leaves 9 inches between the margins. Increase each to 1.5 inches and that area becomes 8 inches. The one-inch loss may matter in a page that is already full.
Those figures are examples, not a recommendation to use a particular margin. Keep enough room for comfortable reading, printing and any notes the reader needs to add. Review the whole file after a page setting change. Earlier pages can move too.
A resume, a class handout and a long report have different needs. Think about the document’s purpose. Then choose a text edit, a layout change or another page.
Treat a table as data you need to preserve
An extra page may follow a table. Inspect the nearby space first. Keep the table content intact while you check. Look for unwanted blank paragraphs or a break. Then check whether the table itself is taking more space than intended.
Google’s table help documents row height, column width and cell padding controls. It also describes options for rows that cross pages. Those settings can help. No single table change fixes every blank page.
Keep every needed row and column. Deleting a row may make the page fit while removing a fact the reader needs. Reduce an oversized gap or review the content first. A table may contain long notes. Consider moving them to the table’s explanation as normal text.
After a size change, read the longest cell and the smallest label. Check that the numbers still align with the correct headings. Then inspect the next page. Keep the table complete and readable. Squeezing its contents may make a shorter file. It can also make the facts hard to read.
The data may need the extra page. Keep it if a tighter fit would be hard to read. Make its structure clear. A useful second page is better than a dense first page that hides the answer.
Work through two common situations
Here are two original examples of the diagnosis process. They are illustrations, not reports of device tests or fixes that will work for every file.
In the first, a one-page event notice has an empty second page. Turn on the marks and inspect the end. Suppose there are several spare paragraph returns after the contact line. Remove only those returns, then check the last visible sentence and the print output. There is no reason to change every margin in the file.
In the second, a report has a large white area before a heading. There is no unwanted page break in the visible marks. Review the heading and the following paragraphs. Suppose the heading needs to stay with its introduction. They no longer fit in the space. You can shorten that introduction, reconsider the rule or accept the space. Deleting the heading would solve the wrong problem.
The two cases look similar from a distance. One is empty content. The other is a layout rule acting on useful content. Start by showing the marks. They will not reveal every cause as a character to delete.
Pageless view changes the reading format
Google describes Pageless as a view that adjusts to the screen. It flows without page breaks. That can suit a living guide read online. That changes the view. A file for print still needs a page layout check.
Pageless can hide page features in that view. These include headers and footers. Google’s printing help adds a caution. Some earlier page elements can still print. For a print-focused document, return to Pages and inspect the final output.
Choose Pageless when it suits the reading task. Do not use it only to hide the page problem. A screen view can hide a symptom while leaving an output decision unresolved.
If your file will be used both ways, check both experiences. A team may read the live document on phones while a workshop leader prints copies. Plan for the actual readers. A setting that makes the editor look tidy may not fit their use.
Confirm the repair in the file you will send
Open print preview or download the file type you need. Google documents both routes through File. Inspect the final page and the page before it. Check where the content ends. Confirm that the contact details, signature area and last row remain.
Google documents a tab choice for print and download. Choose the current tab or all tabs. Confirm the scope. A missing tab also makes the file shorter. That is a separate issue from the empty page.
Use a short final comparison: first heading, last sentence, key table and final page. Then look through the rest of the file for any broad movement caused by margin or spacing changes. A repair that removes one empty page should not silently damage another section.
Keep the clean copy only after that review. Leave a short note for the next editor. Name the actual change. For example: “Removed three empty paragraphs after the contact line.” That tells the next editor what you did.
A quick final content check
Compare the first heading and last sentence. Check the key table and nearby page layouts. Include the correct tabs. Keep the original copy until the actual PDF or printed result passes review.
Did You Know?
A gap may have no unwanted break character. Paragraph rules can keep a heading and its next text together. The marks may show nothing to delete. Check the nearby paragraph settings next. Keep the useful words intact.
Conclusion
Find the reason for the extra page, then change that one thing. Start with visible marks. Check breaks and paragraph rules. Review page settings when the problem points there. Keep a copy when the document is complex.
Once the page is gone, check the actual output. The reader needs a clear file with all the needed content. Check that result, as well as the page count.
FAQs
Why does Backspace fail to remove a blank page in Google Docs?
The page may come from a layout setting rather than empty text. Inspect the visible marks first, then the nearby paragraphs and page setup. Find the cause before you keep pressing a key. You could delete useful text and leave the setting unchanged.
Can I delete a page that contains text and images?
Select the exact passage or object you do not want. Avoid a rough selection across white space. Keep a copy when the layout is complex. Then read the text on both sides. Keep the passages distinct. Check that each image still has its needed caption.
Should I reduce the font size to remove the last page?
Treat that as a design choice after diagnosis. First check for spare paragraphs, breaks and excess spacing. Smaller text may reduce the page count while making the document harder to read. The content may need another page. Give that page a clear structure. Avoid forcing a tighter fit.
Does switching to Pageless delete an empty printed page?
It changes the document’s reading format. That may be useful for online work, but it does not replace a review of the printed output. Use Pages format when the reader needs pages. Check print preview before you send the file.
What should I check after removing a section break?
Compare the nearby pages with the original copy. Look at orientation, margins, headings and any content that used a different layout. A section boundary can serve more than the gap. Check that the nearby layout still fits the document.
References
- W3C CSS Values: Absolute length units
- Google Docs Help: View non-printing characters
- Google Docs Help: Add page breaks and move margins
- Google Docs Help: Change paragraphs and fonts
- Google Docs Help: Change page settings
- Google Docs Help: Pages or Pageless
- Google Docs Help: Add and edit tables
- Google Docs Help: Find changes and earlier versions
- Google Docs Help: Create, copy or download a file
- Google Docs Help: Print a file
- Google Docs Help: Use document tabs
- Techchahiye: Change the default font in Google Docs
- Techchahiye: Make a table of contents in Google Docs
- Techchahiye: Productivity Apps Guide
